Mini Monster Pumpkins: An Easy Halloween Vinyl Craft for Kids
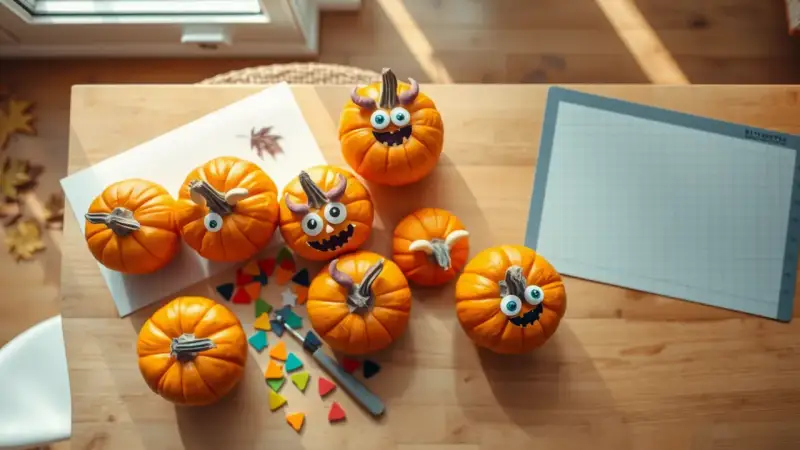
Mini Monster Pumpkins are small pumpkins that get goofy faces made from colored vinyl stickers: googly eyes, jagged teeth, horns and even curly mustaches. You cut the face pieces out with a monster-themed die, peel them off, and press them onto the pumpkin. There’s no carving, no knives and no mess, so kids can do most of the work.
The original version of this craft used a “build a monster” die, which cuts a whole sheet of mix-and-match monster features at once, run through a manual die-cutting machine. Because the die is only about 4 inches square, one small piece of vinyl makes enough parts for at least one pumpkin.
Where These Little Monsters Fit
A finished mini pumpkin sits easily in a child’s palm, so a row of them works on a mantel, a windowsill, a Halloween party table or a classroom desk. Since the pumpkins stay whole, they keep much longer than carved jack-o’-lanterns, so a batch made in early fall can stay out through Halloween.
The project suits a wide range of ages. Preschoolers can peel and stick shapes an adult has already cut, while older kids can run the machine with supervision and decide whether their monster turns out silly, scary or cute. Pumpkins decorated by each guest also make a good take-home favor at a Halloween party.
How to Make Mini Monster Pumpkins
- Mini pumpkins (real or craft-store foam)
- Colored adhesive vinyl in several shades, such as white, black, green, purple and red
- A monster-face die and a manual die-cutting machine, or a cutting machine such as a Cricut
- Scissors
- Wipe each pumpkin clean and let it dry completely so the vinyl sticks well.
- Cut a square of vinyl a little larger than your die, so the vinyl covers every cutting edge.
- Layer the die, the vinyl and the cover on the cutting platform the way your machine requires, then roll or crank it through.
- Pop out the cut shapes: eyes, mouths, teeth, eyebrows and mustaches. Cutting each color separately gives kids more options to mix.
- Peel the backing off each piece and press it onto the pumpkin, smoothing from the center out to push out air bubbles.
- Layer pieces for more detail, such as a black pupil on a white eye or white fangs over a red mouth.
- Line the finished monsters up for display.
The machine used for this craft was the Epic Six, a tabletop die-cutting and embossing tool from Lifestyle Crafts, which was formerly known as QuicKutz. It has a six-inch-wide opening and comes with a 13-by-6-inch cutting platform and a matching embossing platform. It is now out of stock at craft retailers, so any manual die cutter that takes thin metal dies will do the same job. If you have no machine at all, draw simple shapes on the vinyl’s paper backing and cut them out with scissors.
Mistakes to Avoid
Letting kids crank unsupervised. Manual die cutters have rollers that can pinch small fingers, so an adult should stay right beside any child who helps turn the handle.
Leaving loose pieces within reach of toddlers. Small vinyl shapes are a choking hazard, so keep them away from children under three.
Using vinyl that’s too small. A piece that only just covers the die can leave half-cut features at the edges, so trim it slightly larger than the die.
Sticking vinyl onto damp or dusty pumpkins. Moisture and dirt keep the adhesive from holding, so features start lifting at the corners.
Pressing pieces on too soon. Laying out a face on the table first lets kids try several eye-and-mouth combinations before the adhesive touches the pumpkin, because vinyl is hard to reposition cleanly once it’s pressed down.
Choosing pumpkins with deep ridges. Large stickers bridge across the grooves and peel away, so put wide mouths on smoother pumpkins or cut them into smaller sections that follow the curves.