Simple Donut Pumpkins
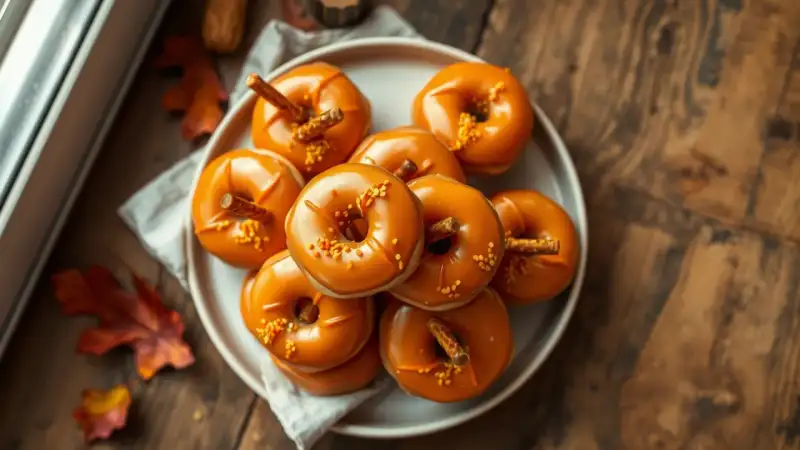
Little round donuts coated in glossy orange candy, each topped with a pretzel stem and a scatter of sprinkles, look surprisingly like tiny pumpkins. They need no oven and no special skills, which makes them a good fit for a Halloween party table, a classroom treat or a fall afternoon with the kids.
The whole project takes a few ingredients and about as long as it takes the candy to melt and set.
What do you need for donut pumpkins?
- Bite-size donuts, plain or powdered-free (cake-style donut holes work well)
- Orange candy melts
- Pretzel sticks
- Sprinkles in fall colors or a Halloween mix
- Lollipop sticks, used here as a spreader
- Waxed paper
- A microwave-safe bowl
Choose donuts that are fairly dry on the outside. A greasy or sugar-coated surface keeps the candy from clinging, so plain cake donuts are the easiest choice.
How do you make them?
- Put the candy melts in a microwave-safe bowl and melt them following the directions on the package. Stir well when they are done so the candy is smooth.
- While the candy melts, cover your work surface with a sheet of waxed paper. Set the donuts on it about six inches apart, since the candy will run a little and you will want room to work.
- Spoon a generous mound of melted candy onto the top of one donut.
- Use a lollipop stick to push the candy across the top and down the sides until the donut is coated.
- Before the candy sets, break a pretzel stick in half and press one piece into the center as a stem.
- Add sprinkles right away, while the coating is still soft enough to hold them.
- Let the pumpkins cool completely on the waxed paper before moving or serving them.
Why work one donut at a time?
Candy melts start to firm up quickly once they leave the bowl. If you coat one donut, add its stem and sprinkles, and then move on to the next, everything sticks. If you coat a whole tray first, the first donuts may have hardened before you reach the pretzels.
If the candy begins to thicken in the bowl, a short return to the microwave will loosen it. Heat in brief bursts and stir between them, because overheated candy turns lumpy and hard to spread.
Can you change the look?
Yes, and the small changes are part of the fun:
- Green stems: Use a dab of green candy melts or a green sprinkle beside the pretzel for a leaf.
- Jack-o’-lantern faces: Once the orange coating has set, dot on faces with melted dark candy and a lollipop stick.
- Ghost version: Use white candy melts instead of orange, and skip the stem.
- Color mix: Make a batch in yellow, orange and white for a varied pumpkin patch.
How do you serve them?
Arrange the pumpkins on a platter lined with fall leaves or on a tiered stand for a party dessert table. They are also a nice small treat to tuck into a snack bag for a school Halloween celebration.
Because the pretzel stems are snapped from a stick, they stand upright and look best when each pumpkin is pressed in at the center. If one leans, gently nudge it before the candy hardens.
Kids can help with nearly every step. An adult should handle the hot bowl from the microwave, and the pretzel pieces are small, so keep them away from children under three.
Can you make them ahead?
Once the candy has set firmly, the pumpkins can be stacked carefully in a single layer in a container with waxed paper between layers. Keep them somewhere cool and dry so the coating stays smooth and the pretzels stay crisp. For the best look and crunch, add the pretzel stems and sprinkles on the day you plan to serve them, working while the coating is fresh.
Pretzels contain wheat, and some sprinkles and candy melts contain milk or soy, so check labels if you are serving guests with allergies.