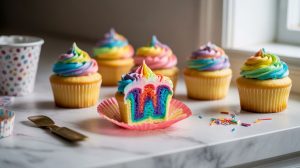
My kids spotted a swirl of color peeking out of a cupcake at a birthday party, and that was it — they were obsessed. These tie-dye cupcakes look like they took hours to make, but the secret is surprisingly simple: you divide plain vanilla batter, stir in gel food coloring, and layer the colors right in the cupcake liner. No special molds, no fancy skills needed. By the end of this post, you will have a dozen show-stopping cupcakes ready to go.
Why You Will Love This Recipe
The biggest draw here is the reveal. The outside of the cupcake looks perfectly ordinary — until someone takes a bite and finds a burst of rainbow colors inside. It makes every single cupcake a little different, just like real tie-dye fabric.
Beyond the wow factor, this recipe is genuinely beginner-friendly. You can turn any homemade or store-bought cake batter into a tie-dye treat, which means you can keep things quick on a busy weeknight. It is also a great kitchen project to do with kids, since the coloring and layering steps are easy for small hands to help with.
Color combinations are completely up to you. Go full rainbow for a birthday party, use pastels for spring, or pick red and green for the holidays. The technique stays exactly the same no matter which colors you choose.
Ingredients
For the Cupcakes
- 1½ cups all-purpose flour
- 1½ tsp baking powder
- ¼ tsp salt
- ½ cup (1 stick) unsalted butter, softened to room temperature
- 1 cup granulated sugar
- 2 large eggs, room temperature
- 2 tsp pure vanilla extract
- ½ cup whole milk, room temperature
- Gel food coloring in 4–5 colors of your choice
For the Vanilla Buttercream Frosting
- 1 cup (2 sticks) unsalted butter, softened
- 3½ cups powdered sugar, sifted
- 2–3 tbsp heavy cream or whole milk
- 1½ tsp pure vanilla extract
- Pinch of salt
- Gel food coloring in 2–3 colors for the frosting swirl
Step-by-Step Instructions
Make the Cupcake Batter
- Preheat your oven to 350°F. Line a standard 12-cup muffin tin with paper cupcake liners.
- In a medium bowl, whisk together the flour, baking powder, and salt. Set aside.
- In a large bowl, beat the softened butter and sugar with a hand or stand mixer on medium speed until light and fluffy, about 3 minutes.
- Add the eggs one at a time, beating well after each addition. Mix in the vanilla extract.
- Reduce mixer speed to low. Add the flour mixture in three additions, alternating with the milk in two additions, beginning and ending with the flour. Mix just until combined — do not overmix.
Add the Colors
- Divide the batter evenly into small bowls — for a 12-cupcake batch, scoop about ⅔ cup of batter into each of your color bowls.
- Add 2–3 generous drops of gel food coloring to each bowl, then stir until the color is even throughout.
Fill the Liners and Bake
- Spoon about one teaspoon of your first colored batter into each cupcake section. Repeat with the next colors, layering in alternating colors until your cups are a little more than half full.
- Use a toothpick to lightly swirl the colors together — but do not mix too much, or all the colors will blend into one muddy shade. If you prefer a clean stacked look, skip the swirl entirely.
- Bake for 17–23 minutes, or until a toothpick inserted in the center comes out clean. Cool in the pan for 10 minutes, then remove the cupcakes and place on a wire rack. Cool completely, about 30 more minutes, before frosting.
Make the Frosting and Frost the Cupcakes
- Beat the softened butter on medium-high speed for 2–3 minutes until very fluffy. Add the powdered sugar one cup at a time, mixing on low after each addition.
- Add the heavy cream, vanilla, and salt. Increase the speed to medium-high and beat for another 2 minutes until smooth and spreadable.
- Divide the frosting evenly into 2–3 small bowls and color each one with gel food coloring, stirring until the color is uniform.
- Prep your piping bag with a star or round tip, then smear each colored frosting into a different section of the bag, keeping the colors level — this ensures an even distribution of all colors as you pipe.
- Twist the piping bag and do a few test pipes onto a paper towel to see the swirl pattern forming, then begin frosting your cupcakes.
Tips and Variations
Get the Best Color Results
Gel food coloring makes for richer, more vivid colors and does not add too much extra liquid to your batter, unlike standard liquid food dye. It is worth picking up a small set if you do not have it already. Using a yellow or white cake batter gives you the most vibrant color payoff.
Dietary Swaps
This recipe adapts easily for different diets. For a gluten-free version, swap the all-purpose flour for a 1-to-1 gluten-free flour blend — the batter comes together the same way. For a dairy-free version, use a plant-based butter and unsweetened oat milk or almond milk in equal measure.
Short on time? You can use a store-bought cake mix as your base — the tie-dye color method works just as well with boxed batter. This is a great shortcut for school parties or last-minute events.
Fun Variations to Try
- Ombre cupcakes: Use shades of a single color (light pink to hot pink to deep magenta) instead of rainbow hues for an elegant, modern look.
- Holiday edition: Use red and green for Christmas, orange and black for Halloween, or red, white, and blue for the Fourth of July.
- Sprinkle finish: Top the frosted cupcakes with rainbow sprinkles for extra crunch and color.
- Mini cupcakes: The same layering technique works in a mini muffin tin — just reduce the bake time to about 10–12 minutes.
Storage and Make-Ahead Tips
Unfrosted cupcakes keep well at room temperature in an airtight container for up to two days. Once frosted, keep them covered and refrigerate for up to four days. Pull them out about 30 minutes before serving so the frosting softens back to room temperature.
To freeze, let the baked cupcakes cool completely, then place them in a single layer in a freezer-safe container or zip-top bag. They freeze well for up to two months. Thaw overnight in the refrigerator, then frost fresh before serving for the best result.
You can also make the buttercream frosting up to three days ahead and store it covered in the refrigerator. Re-whip it with a mixer for a minute or two before using, and add a tiny splash of cream if it seems stiff.
Recipe Details
- Prep time: 25 minutes
- Cook time: 20 minutes
- Cooling time: 30 minutes
- Total time: About 1 hour 15 minutes
- Servings: 12 cupcakes
- Skill level: Beginner-friendly
Frequently Asked Questions
Can I use liquid food coloring instead of gel?
Yes, liquid food coloring works in a pinch. Just know that you may need to use more drops to reach a vivid color, and it can thin out your batter slightly. Gel food coloring is the preferred choice because it delivers stronger color with just 2–3 drops and keeps the batter at the right consistency.
Why did my cupcake colors turn brown or muddy?
This usually happens when the colored batters are over-swirled once they are in the liner. A gentle figure-eight motion with a toothpick is all you need. For cupcakes, you often do not need to swirl at all — the layering alone creates a beautiful tie-dye pattern once baked.
Do these cupcakes work with any cake flavor?
Vanilla or white cake batter works best because it gives the food coloring a clean, bright base to show through. Chocolate batter tends to overpower the colors. If you love a different flavor, try a lemon or almond-flavored white cake — the colors will still pop beautifully.
Can kids help make these cupcakes?
These swirly and colorful cupcakes are easy for kids to help make. Little ones can stir the food coloring into each bowl of batter and spoon the colors into the liners — two steps that feel like an art project as much as a baking activity. Just keep the oven and hot pans for the grown-ups.
Whether you are baking for a birthday, a summer cookout, or just a rainy afternoon with the kids, tie-dye cupcakes bring a little extra magic to the table. Once you see that first colorful cross-section when someone takes a bite, you will absolutely want to make them again.