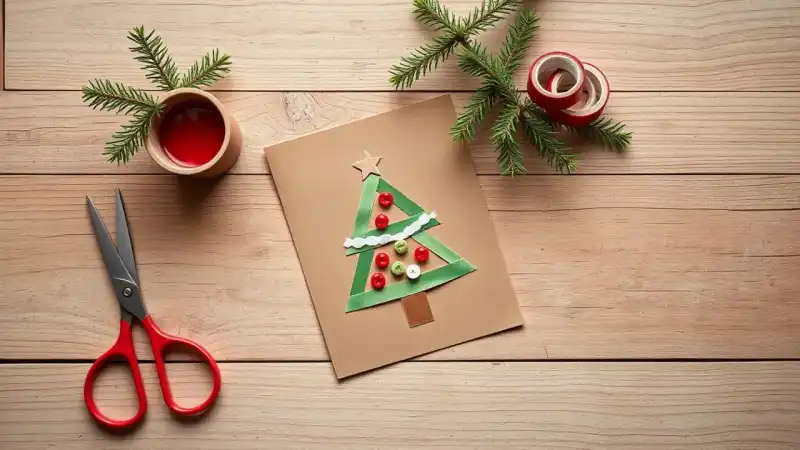
DIY Christmas Cards: 10 Easy Handmade Ideas, Easiest First
The easiest DIY Christmas cards start with a folded piece of cardstock and one simple technique: washi tape strips cut into a tree, thumbprint ornaments, or a potato-stamped pattern. Each can be done quickly. Pop-up and quilled cards take longer, and how long yours take depends mostly on how many layers and how much drying you add.
The 10 ideas below go from easiest to hardest. Most use the same basic kit, so you can make a whole batch without buying new supplies for each design.
Easy DIY Christmas Card Ideas at a Glance
| Idea | Key materials | Difficulty | Time per card |
|---|---|---|---|
| Washi tape tree | Washi tape, cardstock, star sticker | Very easy | Quick |
| Thumbprint ornaments or reindeer | Washable ink pad or paint, fine marker | Very easy | Quick |
| Button tree | Buttons, tacky glue, green marker | Easy | Short |
| Kraft card with twine and wood shapes | Kraft cardstock, baker’s twine, wood cutouts | Easy | Short |
| Fruit- or potato-stamped Santa | Pear or potato, acrylic paint | Easy | Short, plus drying |
| Bubble-print snowman | Bubble solution, food coloring or paint, straw | Easy–medium | Short, plus drying |
| Watercolor wash with white lettering | Watercolor paper, paints, white gel pen | Medium | Short, plus drying |
| Origami Christmas tree | Green origami paper, glue stick | Medium | Moderate |
| Pop-up tree card | Cardstock, scissors or craft knife | Medium | Moderate |
| Quilled poinsettia | Quilling strips, quilling tool, white glue | Harder | Longest |
What Supplies Do You Need to Make Christmas Cards?
To make Christmas cards you need cardstock, a way to fold and cut it, an adhesive and envelopes. Everything else is decoration. Start with this kit:
- Cardstock. Cardstock is heavier paper made to stand up when folded. Cover-weight cardstock holds its shape without cracking at the fold. White, kraft brown, red and green cover most designs.
- Envelopes first. Buy envelopes before you cut. Cut a US letter sheet (8.5 x 11 inches) in half to get two 5.5 x 8.5-inch pieces, then fold each one. You get a 4.25 x 5.5-inch card that fits a standard A2 envelope.
- Bone folder or spoon. Run it along the fold to get a crisp crease. A ruler and a dull butter knife work for scoring the line before you fold.
- Double-sided tape or a tape runner. Dry adhesives don’t wrinkle paper. Wet glue makes thin paper ripple.
- Decorations. Washi tape, markers, a white gel pen, stickers, twine, buttons and paint.
10 DIY Christmas Cards, From Easiest to Hardest
1. Washi Tape Christmas Tree
This card shows a stack of patterned tape strips that get shorter toward the top, so they form a tree. A gold star sits on top and a short brown strip makes the trunk. Washi tape is low-tack decorative paper tape, so you can lift a strip and move it.
- Fold your cardstock and lay it flat with the front facing up.
- Cut 5 to 7 strips of tape, each a little shorter than the last.
- Stick them on from the longest at the bottom to the shortest at the top.
- Trim the ends at an angle so the tree tapers.
- Add a star sticker and a small trunk strip.
2. Thumbprint Ornaments or Reindeer
This card has a row of round, colored fingerprints hanging from thin drawn strings like ornaments. You can also turn brown prints into reindeer with antlers and red noses. It’s the best card for small kids because the “mistakes” look charming.
- Press a thumb onto a washable ink pad or a thin layer of paint.
- Print 3 to 5 marks across the card front.
- Let them dry completely so the marker doesn’t smear.
- Draw strings and caps for ornaments, or antlers, eyes and noses for reindeer.
3. Button Tree
The button tree is a drawn or paper-triangle tree dotted with mismatched buttons in red, gold and green. It has a raised, tactile look. Buttons can be a choking hazard, so keep loose ones away from toddlers.
- Draw a tree outline or glue on a green paper triangle.
- Arrange flat buttons before you glue anything.
- Attach them with tacky glue. Hot glue is faster but needs an adult.
- Let the card dry flat under a light book.
4. Kraft Card With Baker’s Twine and Wood Shapes
This rustic card is brown kraft paper with red-and-white striped twine tied around the front fold and a small wooden star or tree glued on. One set of supplies gives you several looks: a bow, a wrapped band, or twine “garland” with tiny shapes hung from it.
- Fold a kraft card.
- Wrap twine around the front panel only and tie a bow.
- Glue a wood shape at the knot with strong craft glue.
- Stamp or write a greeting underneath.
5. Fruit- or Potato-Stamped Santa
A pear cut in half lengthwise makes a print shaped like a round-bellied Santa. You paint the body red and add a white beard, a belt and a hat. A halved potato carved into a star or tree works the same way.
- Halve the pear and blot the cut side dry with a paper towel.
- Brush on a thin coat of acrylic paint.
- Press it firmly onto the card and lift it straight up.
- Once the paint is dry, add details with paint or markers.
Safety: An adult should do the cutting. Once fruit has paint on it, it is not food. Throw it away so no one eats it.
6. Bubble-Print Snowman
Bubble printing leaves a lacy, foamy texture of overlapping circles. In pale blue, it looks like a snowy sky behind a paper snowman. The bubbles carry color to the paper, and when they pop they leave ring patterns behind.
- Mix bubble solution with a little paint or food coloring in a shallow cup.
- Blow through a straw until bubbles rise above the rim.
- Touch the paper lightly to the bubbles, then lift it.
- Let it dry, then glue on white circles for the snowman.
Kids: Have kids practice blowing out, not sipping. Poke a small hole near the top of the straw so liquid can’t be pulled up. The colored mixture looks like juice, so label the cup “not a drink.”
7. Watercolor Wash With White Lettering
This card has a soft gradient of navy into teal, like a winter night, with white gel-pen snowflakes and a hand-lettered greeting. It looks expensive but needs only basic paints.
- Use watercolor paper, because regular cardstock buckles when wet.
- Wet the paper, then drop in color so it spreads.
- Let it dry completely, then flatten it under books overnight.
- Add the lettering and dots with a white gel pen, and mount the panel on a folded card.
8. Origami Christmas Tree
The origami tree is made of three folded green paper triangles stacked in tiers. It sits up slightly from the card, so it has crisp edges and real depth.
- Fold three squares of origami paper in graduated sizes.
- Fold each one into a triangle or simple tree tier.
- Overlap the tiers on the card and glue them down.
- Add a trunk and a star.
9. Pop-Up Tree Card
When you open this card, a layered tree springs up from the center fold. Two slits cut across the fold make a tab that pushes forward, and the tree is glued to that tab.
- Fold an inner card and cut two parallel slits across the fold.
- Open the card and push the tab inward so it forms a step.
- Glue the tree to the front of the tab.
- Glue the inner card into a sturdier outer card so the cuts don’t show.
Safety: If you use a craft knife for clean slits, an adult should do it on a cutting mat. Kids can use scissors.
10. Quilled Poinsettia
Quilling is the craft of rolling thin paper strips into coils and pinching them into shapes. A quilled poinsettia has red teardrop petals around a yellow center, and it looks almost three-dimensional.
- Roll red strips on a quilling tool, let them loosen, and glue the ends.
- Pinch one end of each coil into a teardrop or leaf.
- Arrange the petals in a star and glue them on edge with a small dot of glue.
- Add tight yellow coils in the center and green leaves.
Christmas Card Ideas for School and Kids
The best Christmas cards for school are thumbprint, washi tape and stamped designs. They use washable materials and no sharp tools, and they take a class one session. For a group, cut and fold the cards before class, put supplies in shared trays, and leave room inside for kids to sign their names. Steps that need an adult are hot glue, craft knives and cutting fruit or potatoes. Glue sticks, tacky glue and scissors are the safer swaps.
How to Mail Handmade Christmas Cards
Handmade Christmas cards mail like regular letters if they are flat, flexible and rectangular. The US Postal Service sets a minimum letter size of 3.5 x 5 inches. Square envelopes, rigid cards and lumpy decorations like buttons or wood shapes can’t go through sorting machines, so they need extra postage. Ask at the counter or check USPS.com before you mail a batch.
For 2026, USPS recommends mailing cards early: First-Class Mail® Service (including greeting cards) should go out by Dec. 17 to arrive by Christmas in the lower 48 states. For international shipments or packages being sent to military members overseas, the Postal Service recommends checking its holiday shipping page for specific deadlines.
Common Card-Making Mistakes
- Making the card before buying envelopes. A card that’s slightly too big won’t fit any standard envelope.
- Folding without scoring. Heavy cardstock cracks along an unscored fold.
- Using too much wet glue. It warps the paper. Use tape runners, or thin glue spread to the edges.
- Writing too soon. Paint and ink smear if you write inside before the front dries.
- Overbuilding mailed cards. Thick decorations cost extra postage and can get crushed. Save them for cards you deliver by hand.
FAQ
– Can you sell DIY Christmas cards?
Yes, you can sell DIY Christmas cards you design yourself at craft fairs or on handmade marketplaces like Etsy. Don’t use licensed characters or copyrighted artwork without permission. Package each card in a clear sleeve with its envelope, and sell sets of matching designs, which are easier to batch-produce.
– What are good DIY Christmas cards for adults?
Good DIY Christmas cards for adults include watercolor washes, quilled poinsettias and pop-up cards. They take more skill and time, and the results look polished. Kraft cards with twine are a quick, grown-up-looking option for big batches.
– How do you make Christmas cards with just paper?
You can make Christmas cards with just paper by folding origami trees, cutting layered paper snowflakes, or making a pop-up tab from slits in the fold. You need only cardstock, colored paper, scissors and a glue stick. Plain printer paper works for the decorations, but use cardstock for the base so the card stands up.
– How far ahead should you start making Christmas cards?
Start your Christmas cards early enough to finish before the USPS First-Class Mail date, which is Dec. 17 in 2026 for the lower 48 states. Count backward from there, and leave extra time for cards that need paint to dry or flattening overnight.